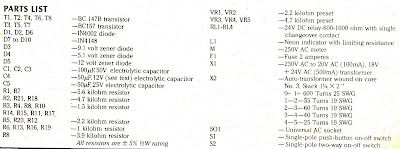
Diode D2 and capacitor Cl provide the sample DC voltage for generating reference voltages for the cutout. For initial setting of cutout, collector of Tl is not connected to the base of T2. Also the time delay capacitor C4 is only connected after both under- and over- voltage points have been preset independently. Initially, due to the potential divider action of resistors R4, R6 and preset VR2, a voltage would appear at the base of T2. · lf this voltage is 0.6 ·V or more above the zener diode voltage of D4, transistor T2 would conduct, energising the relay and connecting the hot tap of the auto-transformer to the universal socket’s hot terminal through N/O contacts of the relay RLl.
Resistor R7 is for limiting base current. Therefore poten- tiometer VR2 is preset in a position where the relay would just switch off below the required lower trip point. On the sample prototype this was adjusted at l55V input, a value at which the output voltage of the regulator was 200V—the lower limit for our specified regulated output. Whenever output voltage goes below this safe operating voltage, the relay releases and disconnects the power to the appliance and simultaneously gives a visible indication of this by applying power to the neon light through its N/ C contacts. At this point the collector of Tl is connected to the base of T2. Again a sample voltage would be available at the cathode of D3 due to the potential divider action—of Rl, VR1 and R3. If this voltage exceeds the zener voltage of D3, transistor T1 would be able to conduct. This would clamp the base of T2 to ground.
Since the base ofT2 has been pulled to ground, T2 would be no longer conductive and hence once again the cutout relay would be released, disconnecting the supply to the load. Preset VRl is so adjusted that as soon as the output supply voltage exceeds the upper limit (240·volts in our case), transistor T1 conducts and releases the relay. Once the over- and under-voltage points have been set, capacitor C4 (whose value may be found out experimentally) may be added between the base of T2 and ground. This capacitor is essential to introduce a time lag in the operation of the cutout when rapid variations occur in mains supply. With capacitor C4 connected, the cutout waits till a steady level of voltage is reached. This also helps in avoiding erratic behaviour of the cutout. Referring to only one section, say around T3 and T4, of our regulator circuitry, we find that transistor T3 would conduct when its base is at a negative potential as compared to its emitter. The emitter of T3 is fed with a fixed reference voltage from the anode of D5 which remains more or less constant over the input voltage range.
Preset VR3 is adjusted to a point where, any further increase in the input voltage switches T3 on, and consequently T4,·pulling_ RL2 on. Further stages are similarly set at different voltages. Setting Having checked up the wiring, procure a variable auto- transformer (known as variac) to set the correct input-output voltage range. A very simple test for making sure that all stages of your circuit are operating is to feed input mains voltage and see that all the relays can be switched on or off by merely changing the settings of presets. At this stage no output load should be connected to the regulator. lf any part of the circuit remains permanently on or off, then the components as well as wiring for that particular stage may be checked thoroughly for faults. lf everything seems correct then connect a good quality multimeter, switched to read 250V AC, at the output socket.
The cheap type of AC voltmeter mounted on the regulator panel is generally not a reliable instrument for accurate readings and should periodically be checked for calibration. Using a variac apply an input between 155 to 160 volts till you get an output just around 200 volts. Reduce this voltage slightly and make sure that as soon as it reaches below 200 volts (threshold between 195 and 200V) the low voltage cutout transistor T2 switches off, releasing RL1. For this test, base of T2 should not be connected to collector of Tl, so also positive of C4,_ as described under the cutout section. At this point no voltage would be available at socket SOI and neon Ll would be lit. Increase and decrease this voltage at the threshold range a number of times to make sure the steady repeat accuracy of the cutout. Having set this, preset VR2 may be sealed with a blob of paint. Next keep on increasing the input volts till the output just reaches 240V our upper limit for regulated voltage.
Till this _ stage all the presets of the regulator must be so positioned that none of the relays is on. So far as the auto-transformer is concerned this would mean that the input hot line is connected to point 1 of the transformer with output at point 4. incidentally this is the maximum step-up given by the transformer for the lowest input range. As soon as output voltage tries to shoot beyond 240V, preset VR3 should be adjusted to switch on RL2. ` This would change the input hot end from point l to point 2 of X2, thus reducing the step·up ratio of X2. Keep on increasing the input voltage with variac till again it reaches 240V output. Now the relay RL3 should be adjusted with preset VR4 to switch on, further reducing the step-up ratio.


No comments:
Post a Comment